Wednesday, July 12, 2017

AoA for Helen Attebroke

I had been fascinated by The Feather Book of Dionisio Minaggio for over a year now. The book was labeled as being created in 1618 and, in all honesty, my original fascination came with the commedia characters that were portrayed in it.


Each picture was created from feathers. Not just feathers, but also skins, beaks, and feet of birds. And, of course, ink for the writing.

As soon as I got an assignment, I began collecting feathers. As can be seen, the colors are amazing in these pictures! The man who made the book was the chief gardner and it is speculated it was a way to use up the feathers from the kitchen. But the pictures were amazing, so I spent time collecting mallard wings and nearly whole bodies of pheasants until I had a pretty amazing collection.


The collection kept growing because as I began I realized I needed many sizes, many shapes, and of course, many colors. But I learned many things while working on this project.

In the end, the entire thing was done on watercolor paper using feathers from turkey, quail, pheasant, mallard, goose, and chicken. The chosen glue was an appropriate fish glue.


I learned many things along the way.

- Never ever EVER trust that your fingers will be appropriate for the job. No matter how much you use brushes and tweezers and toothpicks and blades, your fingers are sticky and they will wreck havoc on your piece.
- A #11 blade is going to be your best friend for cutting, shaping, placing, and reshaping while on the paper. Trust it as long as it isn't sticky.
- Remember that feathers are waterproof. This creates difficulties when trying to mix the thick glue and water. The ratio is a very careful balance that I have yet to perfect.
- Feathers also have curve and shape depending on where they are situated on the bird. Don't fight with the feathers. Use them for their angles. Wait to find the right spot.
- Do not sneeze. Do not breathe. Do not cough. And dear lords, do not have the ceiling fan turned on. Use the same rules as you do for doing gold leaf.
- Do not throw out anything. There will be times you will smack your forehead as you realize that a small piece you brushed aside would be perfect to fill in a specific gap.
- Don't be afraid to add more glue. And water. And watered down glue. And watery glue. And water on top of glue. And glue on top of water.
- Let things dry. Use severe amounts of patience. If you try and brush on more glue, everything -will- move. If you try and cut or scrape away excess before it is dry, everything -will- move. Work in smal areas all over the picture at the same time if you are limited with time. Otherwise this should be a project that easily takes a month.


Things I learned in hindsight that I want to incorporate next time::

- It is obvious in some of the pictures from The Feather Book that there was art underneath the feathers, more than just an outline sketch, but painted colors. Perhaps as a guide for the staff to know what colors to lay down where. I would like to try that next time so there isn't as much concern with filling small gaps because the same color will be underneath.
- Upon closer inspection, it appears that after the picture was created, it was then cut out to give it super clean edges from the feathers and then that feather cut out picture was placed into the book and words were written. Next time I would like to try that as well in hopes of giving a cleaner appearance.

Either way, I'm incredibly proud of the efforts I went to in putting together the scroll.

This particular scroll was an AoA for Helen Attebroke. Words by Tristan le Chanticler:

"Eight July came swiftly, A.S. two and fifty,
Amid blood and gore of the Great Northeastern War,
When Majesties Imperial brought gift to thee,
Ionnes Stark and Honig Sweet, you knelt before.
Awarding Arms, Helen Attebroke, emblazon,
Per chevron green and white, four barnacles in pairs,
With harp arranging, thereby hearts counterchanging.
In love and war will tensioned strings loose wondrous aires!
Know that whenever bow, or back, or song are bent,
Within Our homes or halls, or on Our fields or wall,
This fletchèd point drives deep and true, when talent’s lent,
That patient crafts in steady hands meet duty’s call!
Thus flock and knock fine feathers on Our Eastern wing

As the thrumming archer's harps our victories sing."

He played nicely into the feathers and the fact she was an archer and a harper. The words really pulled it all together.

Here is the final scroll:


For more pictures from the actual book, visit this site.

Tuesday, May 30, 2017

Emerald for Olivia Baker

The Emerald is a baronial award in the Barony of Concordia of the Snows that is given for incredible work in the area of persona.

Olivia is a very close and very dear friend of mine. When I saw her name come across the polling, I was hoping to be tagged if she made it out the other side to make her scroll. Of course, I did end up getting the pleasure and honor of making her scroll which was, of course, a delight.

But! It was finals time and I knew the only way I would have time to make her scroll before the event was to see if someone would help by doing the words for me, so I tagged in on Drake Oranwood, a well known bard and creator of sonnets, to work on the words for an award for his teacher, Olivia.

The words he came up with read as thus (You can read more about how he came up with his scroll here):

"Those hours, by her patient work, did frame
The lovely frock where every eye doth dwell;
She’ll play the tyger, to advance our game
And, most unfair, she fairly doth excel;

For never-resting hands sew garments on—
Olivia Baker will adorn with care;
Her friends will frost, and layer’d well upon,
Beauty o'er-cometh bareness everywhere:

Then good Queen Bess’s distillation kept,
Immers’d below the salt in halls of feast,
Beauteous court recalled from where it slept
To life, no mere remembrance in the least:

 She hath distill’d all this, and so ‘tis meet,
 An Em’rald show; her substance well shines sweet.

Adorned at the thirty-seventh Wars of the Roses
On this 28th day of May, AS LII
By Baron Jean-Paul DuCasse and Baroness Lylie Penhill"

Along with the words, he researched proper spelling and letter formation based on the period and sent that along with the words. In the end, I chose a bastarda style script for the hand and for an illumination, I studied a variety of cadels before deciding on a cadel work that would showcase elegance and allow me to use some gold work as well as red lines in it.  Most of my inspiration came from the Matriculation Register of the Rectorate of the University of Basel, Volume 1 (1460-1567).

The final result was this:


Sapphire for Muirgheall O'Riein

The Sapphire is a baronial award from the Barony of Concordia focusing on prowess in the arts and sciences.

The words were written by Aislinn Chiabach and read as follows:

"
There is a tale told of a gift given in ages past.  The gifter wished the gentle to understand especially the form, the number, the material, and the color of the gift.


The roundness of the ring signifies eternity, which has neither beginning nor end, moving from the terrestrial to the celestial, from the temporal to the eternal.

The one single band signifies a constancy of mind  neither to be cast down in adversity or elevated in prosperity

The color and the type of stone is  the crux of the gift:

Sapphire, profound azure, for the Arts and Sciences, expression in its varied forms, branches of knowledge, and truths.

The giver entreated the gentle to value the mystery implied by the gift more highly than the gift itself.

We, Baron Jean-Paul Ducasse and  Baroness Lylie Penhill, sentinels of Our Beloved Baronial Lands of Concordia, have looked for folk both near and far who embody these gem like qualities.

Muirgheall O'Riein is well known for her creativity in the fine and ancient art of Pysanky, the dyeing of eggs. This art has existed for so many generations that time has forgotten when it first came to be. It has been deeply tied to festivities in many a land.

Muirgheall has expressed the art of Pysanky with a delicate grace. Not only does she create these marvelous eggs for others to enjoy, she teaches her skills at every opportunity. Through Muirgheall's tutelage, may this art continue perpetually.

For exemplifying all the qualities in that ancient tale, today We have decided to include Muirgheall O'Riein into Our Order of the Sapphire.  For she is a gift to Us, and all of Concordia.
Done this Day the 28th of May in the Barony of Concordia of the Snows.  Anno Societatis 52."


The hand for the calligraphy was a style of miniscule.

The illumination inspiration was from a book called Scivias illustrated by Hildegard von Bingen in 1151. The actual illustration in the book is lovingly nicknamed the Cosmic Egg, which just felt right. There were a few changes, only so that the depictions of designwork that Muirgheall O'Riein has used in making her Pysanky would be visible as well.

Done using sumi ink, walnut ink, gold flake paint, and gauache. No picture I seemed to take gave the colors justice, though.

Thursday, January 19, 2017

Commedia Leather Mask Making

It is about time I pulled together this post.

Over the summer during Pennsic, I made a plan with a friend of mine to learn his craft of leather mask making. I made a deal that during the course of Pennsic I would make a mask. Drake hauled all of his supplies and gave me the great gift of tools and, most importantly, knowledge. I don't think I can ever repay him for all that he did for me that year at Pennsic!

I would like to take some time now to discuss the process, with pictures. He is an incredible teacher and I am hoping I have learned enough that I can pass along all I have learned and share this incredible wealth of knowledge.

The mask making procedure began with needing to create a negative of my face.


Here I am all prepped and ready. To make a negative, it is best to fully protect your hair, so we used both a shower cap and a t-shirt. The shower cap was nice because it would allow for a very obvious line when the negative and following positive was complete as to where a comfortable end point for the mask is.

Once ready, I laid down on a table to be at a comfortable height and put vaseline on my eyelashes and eyebrows so that nothing would stick to them. That would have been rather painful. Straws were then placed in my nose, which I had to hold, and a piece of cloth went into my mouth so we could have a definition between where my upper lip and the bottom of the mask would comfortably be. Once I was prepared, an alginate mixture that held good definition was placed on my face followed by plater bandages to a thick layer that would easily make a good positive. The following picture was not me but my partner in crime that wanted to do the same challenge at Pennsic, Brooke.


After letting everything dry, the negative was carefully removed and dried before a release agent was sprayed inside so that a positive plaster could be poured inside. The result was uncanny... and a little ghostly.


Once the positive was released, it was time to start crafting. An oil based clay was used and built up on the face to create a mask of sorts. You will notice that there is a blank area around the bridge of the nose. That is because it creates a point of reference for how and where the mask will sit on your face. With everything else built up, to make certain the mask still fits comfortably to your specific face, a point of reference is necessary and highly recommended.

Here is a picture of Zagna, my first mask, as well as a picture where, after casting, I cut her in half so it is easier to visualize how much the clay is built up in the mask.


After the clay is built up and the design is somthing satisfactory, it is important to smooth the clay as much as possible. There are two reasons for this. One reason is so you have less problems with removing the negative from the positive. The second is that you will need to do a lot less clean up work with the cement positive you will eventually be making in the end.

After finishing the clay mask, a dam is built with the remaining clay around only the form of the mask by about 3/4" all the way around. This is so when you pour in the plaster you will be using for a negative, it stays in a specific area. As with each pour that is done, it is important to remember a releasing agent. It is also important to pour into the detailed areas first and use your fingers to gently keep air bubbles from remaining and get the plaster everywhere it needs to be.


After the plaster negative of the clay form is made, more daming is done to build up an even wall all around the edge of the negative. A wooden plaque which will be used to nail the leather on to is guaged along what will be the back of the mask form and screws are placed into it at angles to help strength the mould all the more.


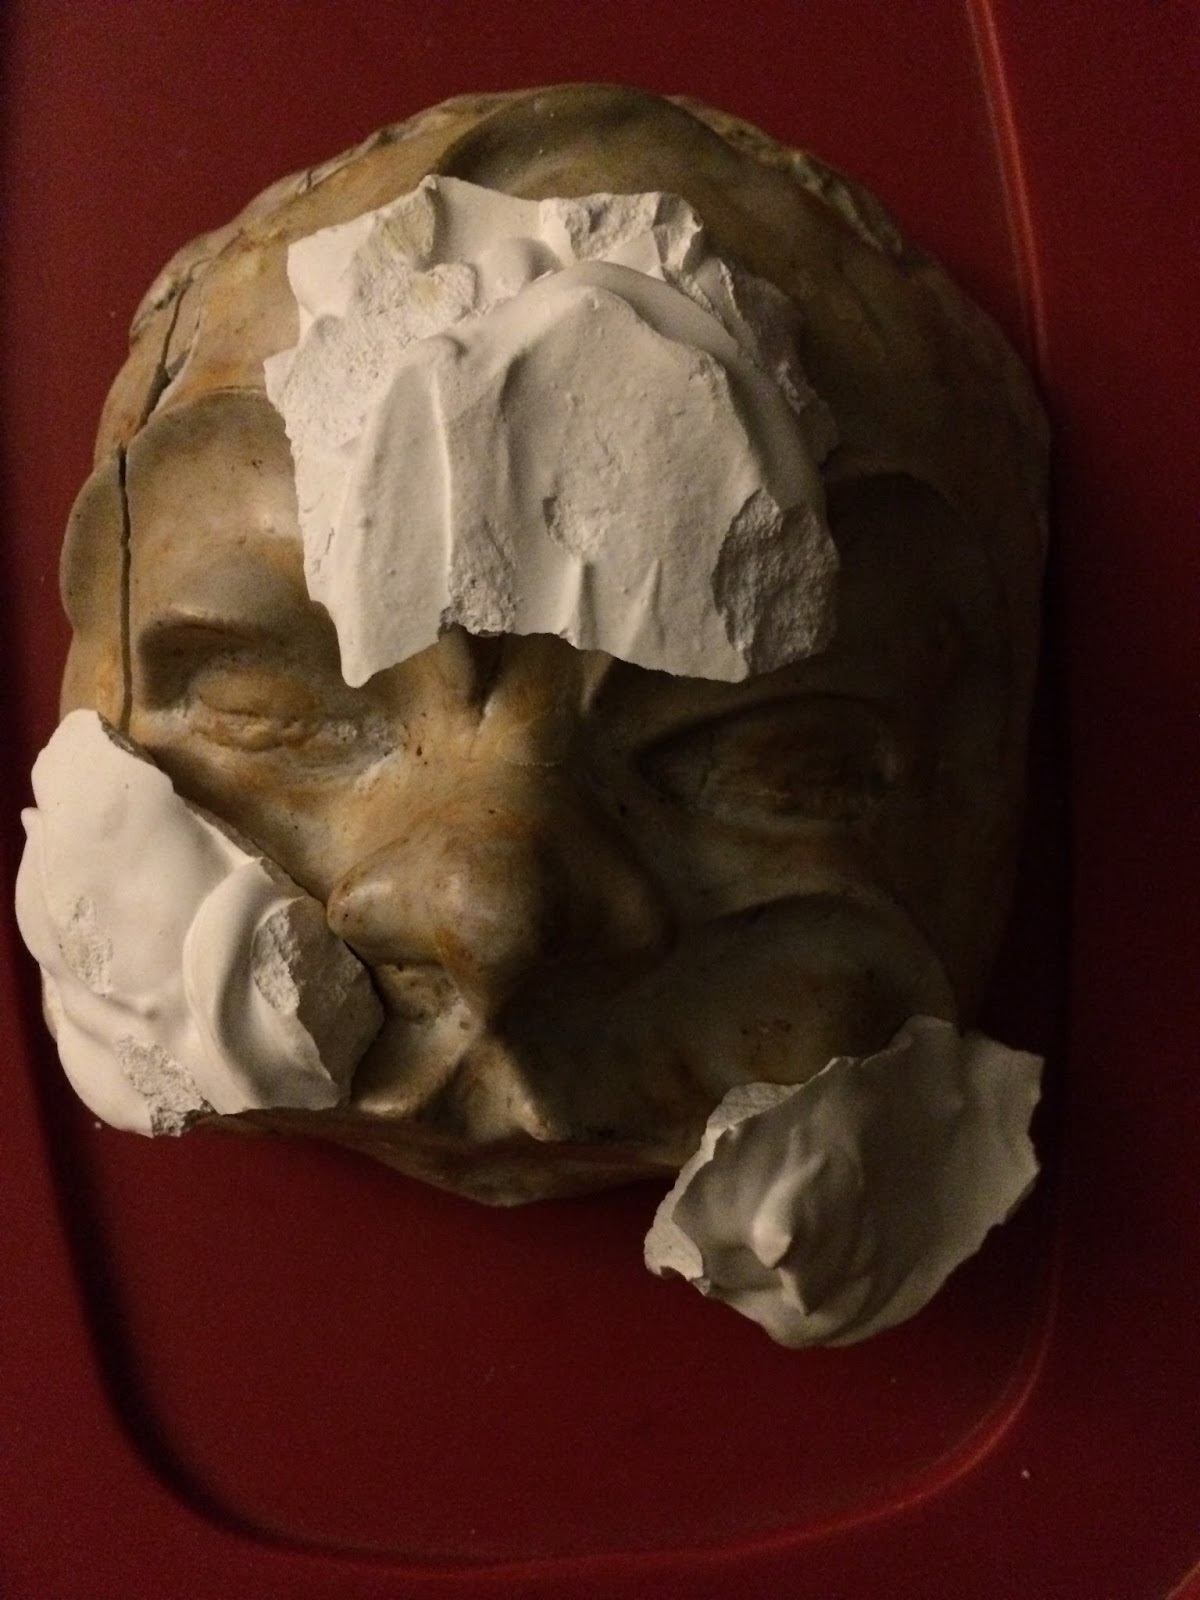
Not much of the negative will remain. No matter how much you try and cut down, the problem is you suddenly have something that easily can have undercuts that will keep the plaster from removing nicely from the cement. Here is a photo of the few chunks that remain after removing the positive cement from the plaster mould.


The plaster can be removed with a gentle rawhide hammer, always knocking gently away from the actual mask form. Once the cement is free, make sure to seal it with something that will keep the cement and wood from ruining in water.

The next step is wetting down the leather. It takes soaking and massaging and squeezing the leather to release all the tannins and make the leather soft and plyable to work with. When it is, you can start to work it down along and onto the form of the mask. Start at the highest point, which is usually the nose, and stretch and pull the leather until, when you turn over the mask, you know there wont be any shifting.


Carefully begin tacking the wet leather down along the wood backing, cutting and overlapping small areas where needed. If there is a large portion that will not tack flat, that will most likely need seaming when you are finished.

Here is Zagna after tacking down the wet leather. And although the nose doesn't need seaming, it is obvious the upper lip will.


Once all of the leather is tacked in place, it is time to begin working with your tools. You don't want to work on the weather when it is too wet, so give in a little bit if you can. The pecking and burnishing will work a lot better when the leather is only a little damp. If it dries out too much, you can always re-moisten it with a spray bottle of water.

These are the tools that are needed: a horn hammer for pecking and a smooth wooden instrument for burnishing (or any other smooth and hard piece of material. Horns/antlers that were smoothed down were also used).


Pecking is the act of making very small dimples on the leather using the thin end of the hammed. You always want to work from the highest points downwards, stretching the leather in those directions. After pecking, the burnisher helps to smooth and seal the leather, working with the fibers to help it keep the form you are pressing it into. Here is an example of a piece of leather that has been wet (on the left), pecked (on the right), and burnished (in the middle).


The differences are subtle between the unfinished and the burnished on such a small piece, but when you look at the finished working mask, it is very obvious the shine that the burnishing creates. Here is Zagna, finished with her pecking and burnishing.


As you can see, seam work still needs to be done as well as cutting out the eyes. The next step, really, is to cut the mask free of the cement block so the eyes and skiving for the seam work can be done.

The seam work is simply making three flaps that are then skived down tremendously thin so that they will not make a huge differentiation from the rest of the mask. The eyes follow the shape and lines of the mould form and should be easy enough to follow and cut out before burnishing to finish them.

Turning the mask over, the entire inside edging needs to be skived feather thin so it can then be notched and glued into place, often with a wire edging as an extra safe precaution to help the mask keep its shape. Here are photos of the skiving and turning before the notching, and after the notching once everything is glued into place.


After a layer of polish on her front and a layer of laquer to keep sweat from ruining her on the back, all she needs is a strap to hold her in place.

And here she is, Zagna, all finished.


Here are some extra photos of things I learned along the way and some of the other masks I am working on. If you would like to know more, please come and find me with my whole display at King and Queens Arts and Science this coming February.


We all make mistakes. Mine was not realizing that my container I was carrying Zagna around in wasn't fully closed and she fell out on the Pennsic streets. Of course, I didn't think anything about it at the time and kept working. But when I cut the leather free and the pressure was no longer there, her face fell in half. Since I would like to use her again, I found some gorilla glue...


...and tied her tight together. She is still in working order and now appears very much like she is an extant find because of my mistake.


This was my beginning thoughts for a Fosca mask. I am very glad I revamped the entire idea and tried again.


This is a negative of the revamped Fosca who is a much creepier mask choice.


This is her both in her cement form and with the burnishing process underway with the leather. She is a creepy mask and I love it.

Here is the beginning of Pantalone, a wrinkled, worried sort of man.


A side by side comparison of two different Pantalones, ready for their leather stretching phase.


This is the latest mask, Brighella. He is just about ready for his cement pour.

Update: I have continued working on the masks and have displayed them twice now, once in a competitive setting. I displayed at the EK King and Queens bardic/A&S competition in 2017 and at Pennsic 2017. Here are pictures of the display, as they are interactive explanations of how masks are made.


New masks are continually being made and a lot of research has been done as to how the masks were made, finding graphic representation of masks in period, and trying to recreate the mask of movement through body language as well as the actual face mask.

Apollo's Arrow for Katherine Murray

Based on the design work of Elizabethan fans, this scroll was fully paper cut before glued together with another piece of darker paper and a white letter work done. The glue was fish glue, a period recipe.

The words were based on a Charter to Sir Walter Raleigh, 1584.

"Brion, King, and Anna, Queene, defenders of the East, to all people whome hear these presents, greetings.

Knowe yee that of Our welbeloued seruant Katherine Murray through her bowe shows especial grace, certaine science, and meere motion. She giues and graunts with arrow to take, and leade in the necessary safetie of al men.

Provided alwayes, and Our will and pleasure is, and Wee do hereby declare that saide Katherine Murray be giuen and graunted licence to holde, occupie, and enioye the right of Our Order of Apollo’s Arrow.

Witnesse Our Selues, at Kingdom 12th Night, in Barony of Ruantallan, the 14. day of January, in the one and fiftieth yeere of Our Society."

Words, calligraphy, and paper cut illumination done by me.

Examples of the paper cut fans:


Scroll:


AoA for Evelyn of Easton

I'm a little back logged in getting some of my work up.

This is an award of arms that was created for Evelyn of Easton. It was done to appear like unto the manuscript of Playford's Gathering Peascods, as Evelyn is a dancer. The words were written by Lord Tristan le Chanticleer.


Gathering Lady Evelyn

To Gathering Peascods, Playford 1651, Arr. PCB

Section A – 1st Repeat
Now Avelina Queen
            and Kenric rightly King,
Are moved to dance and sing

Section A – 2nd Repeat
For cooks who keep the Weasel iced
            And feast to table bring
In joy as rafters ring.

Section B – 1st Repeat
‘Tis Evelyn of Easton’s hold
            Whose service makes Us bold
For virtues should be told

Section B – 2nd Repeat

            For she is light of foot
                        and quick with needled thread,
            We hold it enough said.

Section C – 1st repeat
In A.S. Fifty One,
            On September 3 is done,
As Smoking Rocks today takes pearls,
            New Baroncy unfurled,

Section C – 2nd repeat
For this and other charms,
            Bestow Award of Arms,
And cut the heralds short to greet,

            this Lady of the Court.